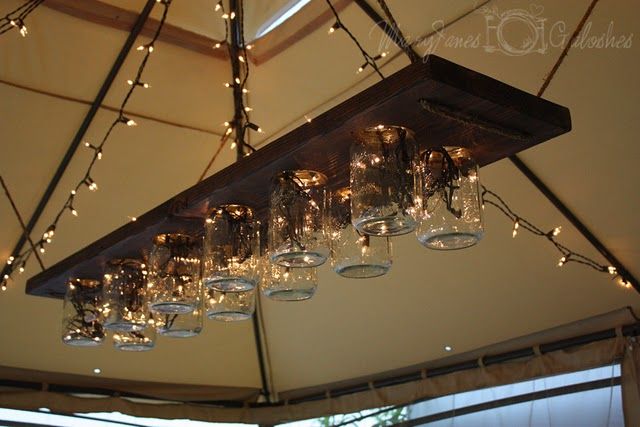
8.03.2011 Mason Jar Light Tutorial I must say… this project freaking ROCKS!&

Mason Jar Light Tutorial
I must say… this project freaking ROCKS!Ð’Â I’m so in love with how it turned out, it’s SUPER simple, and I’m so excited to show you how you can make one!!! It’s part of my outdoor living space for True Value.Ð’Â It was inspired by something similar I saw on pinterest, but I didn’t see any tutorials out there that really show just how you can make one…. until now!Ð’Â The big reveal…….
I had a few ideas for what I wanted to do for lighting in the gazebo.Ð’Â I had seriously considered spray painting an old broken chandelier and wrapping it in christmas lights and hanging that from the center of the gazebo….Ð’Â it would have been fun, maybe someday when I get bored with this I will still do that… but for now, I’m loving this!
What you need-
A big board!Ð’Â You can decide how long you want yours, mine is 4.5 feet of a 2×12 board.
Hole saw bit the size of your jar lids.Ð’Â I picked up my bit and jars both at True Value so I was able to match up the size right there.
Large, wide mouth mason jars (True Value)
White christmas lights
Stain, I like dark wood so we used a mahogany stain
12 feet of rope
Palm or circular sander (mine’s a Dewalt circular sander from True Value)
Drill
Construction grade adhesive in a caulk gun
Hammer
One long screw (or something like it, I’ll explain later)
measuring tape
I determined how long I wanted my overall fixture by laying my jars out at a spacing I liked and cut the board to length.Ð’Â Make sure you use a measuring tape and make all of your spacing even (including the space between the two rows)
Mark where each of your jars center falls and drill your holes with this awesome hole bit…..Ð’Â Drilling tip- drill all of your holes (including the ones for the rope later) from the same side, that way if you have any splintering you can hide it all on one side!
Getting the wood out of your bit can be a challenge.Ð’Â If you have an extra set of hands it’s a lot easier, but not required.Ð’Â There is a hole at the top of your drill bit, stick your long screw into the hole and use your hammer to pound it down.Ð’Â The wood will pop right out.Ð’Â If your screw gets stuck into the scrap you can simply back it out (that’s why a screw is ideal).
With a drill bit the size of your rope, drill two holes in each end (see picture for placement).Ð’Â Once all of your holes are drilled, use your sander to go over everything.
Dust the board from any sanding residue and stain to your liking.
String 6 feet of rope through each end.Ð’Â If your rope frays, wrap the end in some masking tape like a shoe string, it will help it go through the hold.
Now for the jars….. remove the lids, you won’t need them for this project so put them somewhere for a later date.Ð’Â Put a line of construction adhesive in each hole and insert jar.Ð’Â The adhesive isn’t pretty, but you won’t be able to see it once the lights go in and it’s hung.Ð’Â Just be careful not to let any ooze out the side that the jars come out.Ð’Â If you space your jars out on the ground and do a dry fit, then put the glue in the holes, you can place the board on top of the jars which will use the weight of the board to hold it all together until it cures.Ð’Â Ours took 48 hours to cure, but once it’s cured it’s rock hard.Ð’Â The threads on the jar help give it something to grab onto.
tick tock….. waiting for things to dry is no fun!Ð’Â Once its cured you can fill each jar with some christmas lights and hang that baby!Ð’Â We hung ours from the poles of the gazebo using some fancy knot my husband didn’t know the name of….. not much help to you… Obviously if this thing fell it would be a huge glass mess, so make sure if your not a knot person that you look into fancy knots before you hang to be sure you get something really secure (or call a boyscout troop).