How to Make a Fleece Tie Sleeping Bag

Fleece sleeping bags are a good choice for a sleeping bag for indoor use, either by an adult or a child. A child might use a fleece sleeping bag for napping or many indoor play situations. An adult can use a fleece sleeping bag for curling up in an easy chair or couch. A fleece sleeping bag is also suitable for sleeping in an outdoor tent, provided it is a warm summer night. There is an easy no-sew technique that can be used to make a fleece tie sleeping bag. With a pair of scissors and a large piece of fleece fabric, you can create a sleeping bag in a matter of minutes.
Things You’ll Need
- Scissors
- Thick fleece
- Straight pins
- Tape measure
Instructions
- Determine the size sleeping bag. A standard sleeping bag is 30 inches wide. A standard youth sleeping bag is 64 inches long and a standard adult sleeping bag is 80 inches long. Since you are making your own sleeping bag, you can make it specifically for person who will be using it. The width of 30 inches should be considered standard, but the length should be made approximately 6 to 8 inches longer than the height of the person. Add 4 inches to both the width and length dimensions and multiply the width dimension by two.
- Cut a piece of thick fleece fabric to the dimensions from Step 1. Fold the fleece fabric in half width-wise with the right side of the fleece fabric facing out. Square the edges and make sure they line up. If necessary, trim the fleece edges so the edges are matched. Place a few straight pins along the edges to make sure that the fleece doesn’t shift.
- Determine what 1/3 of the length measurement is by dividing the length of the fleece by three. Measure down from the top edge of the folded fleece along the raw edges and place a pin at the point that represents 1/3 of the entire length measurement. This will be the point where you will begin to join the sleeping bag edges together.


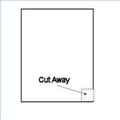
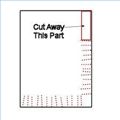
- Cut 4-inch slits through both fleece layers along the bottom edge of the fleece, beginning at the square cut in Step 4. Again, the slits should be 1 inch apart and should continue until the last slit is one inch away from the folded edge.
- Begin matching the upper and lower fleece ties that were just cut to close the sides of the fleece sleeping bag. The tie from the top fleece layer and the tie from the bottom fleece layer that are immediately above and below one another will simply be tied in a double knot to secure. Position the knots so that they are right at the base of the ties (4 inches from the raw edges) and tie the knots quite tightly. Tie each pair of ties together around the bottom edge and side edge of the sleeping bag.
