


- All
- Best Sofas
- Buy Chaise Sofas
- Buying Guides
- corner sofas
- Furniture Buying Guides
- Furniture Outlets
- General
- Home Decor
- home furniture outlet Sydney
- Living Room Design
- Sofa Beds Guides
- Sustainable Living
- Termite Inspection Sydney
- Termites Treatment

The most effective way to get rid of termites in Sydney is to use a licensed pest controller who can confirm the termite species, find the colony’s access points, and apply a treatment that matches the property’s construction and risk level. In practice, that usually means a combination of a baiting programme and a chemical barrier, plus fixes that remove moisture and timber-to-soil contact. Because termites can be...
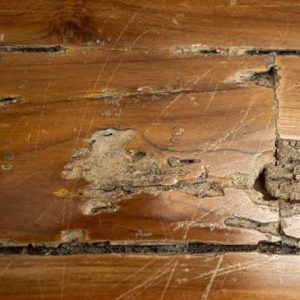
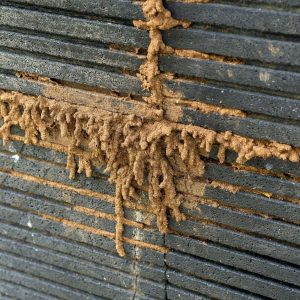
Termites are one of the most expensive household pests in Sydney because they can work quietly for months before anyone notices. The good news is that most infestations leave clues early on, as long as the household knows what to look for and checks the right places. This guide covers 6 early warning signs of termites that Sydney homeowners often miss, along with practical Sydney termite control insights,...
How often should a homeowner arrange a termite inspection in Sydney? In most cases, the safest baseline is annually, because Sydney’s climate and housing stock can support termite activity year round. The exact timing still depends on the property’s risk level, construction type, and local conditions. This guide explains practical inspection intervals, what changes the schedule, and how to stay protected without overpaying. How often should most Sydney...